
B33: The Horsehead and The Flame Nebula (NGC 2024) in LHaRGB - A “Failed” Image
Date: December 10, 2021
Cosgrove’s Cosmos Catalog ➤ #0090
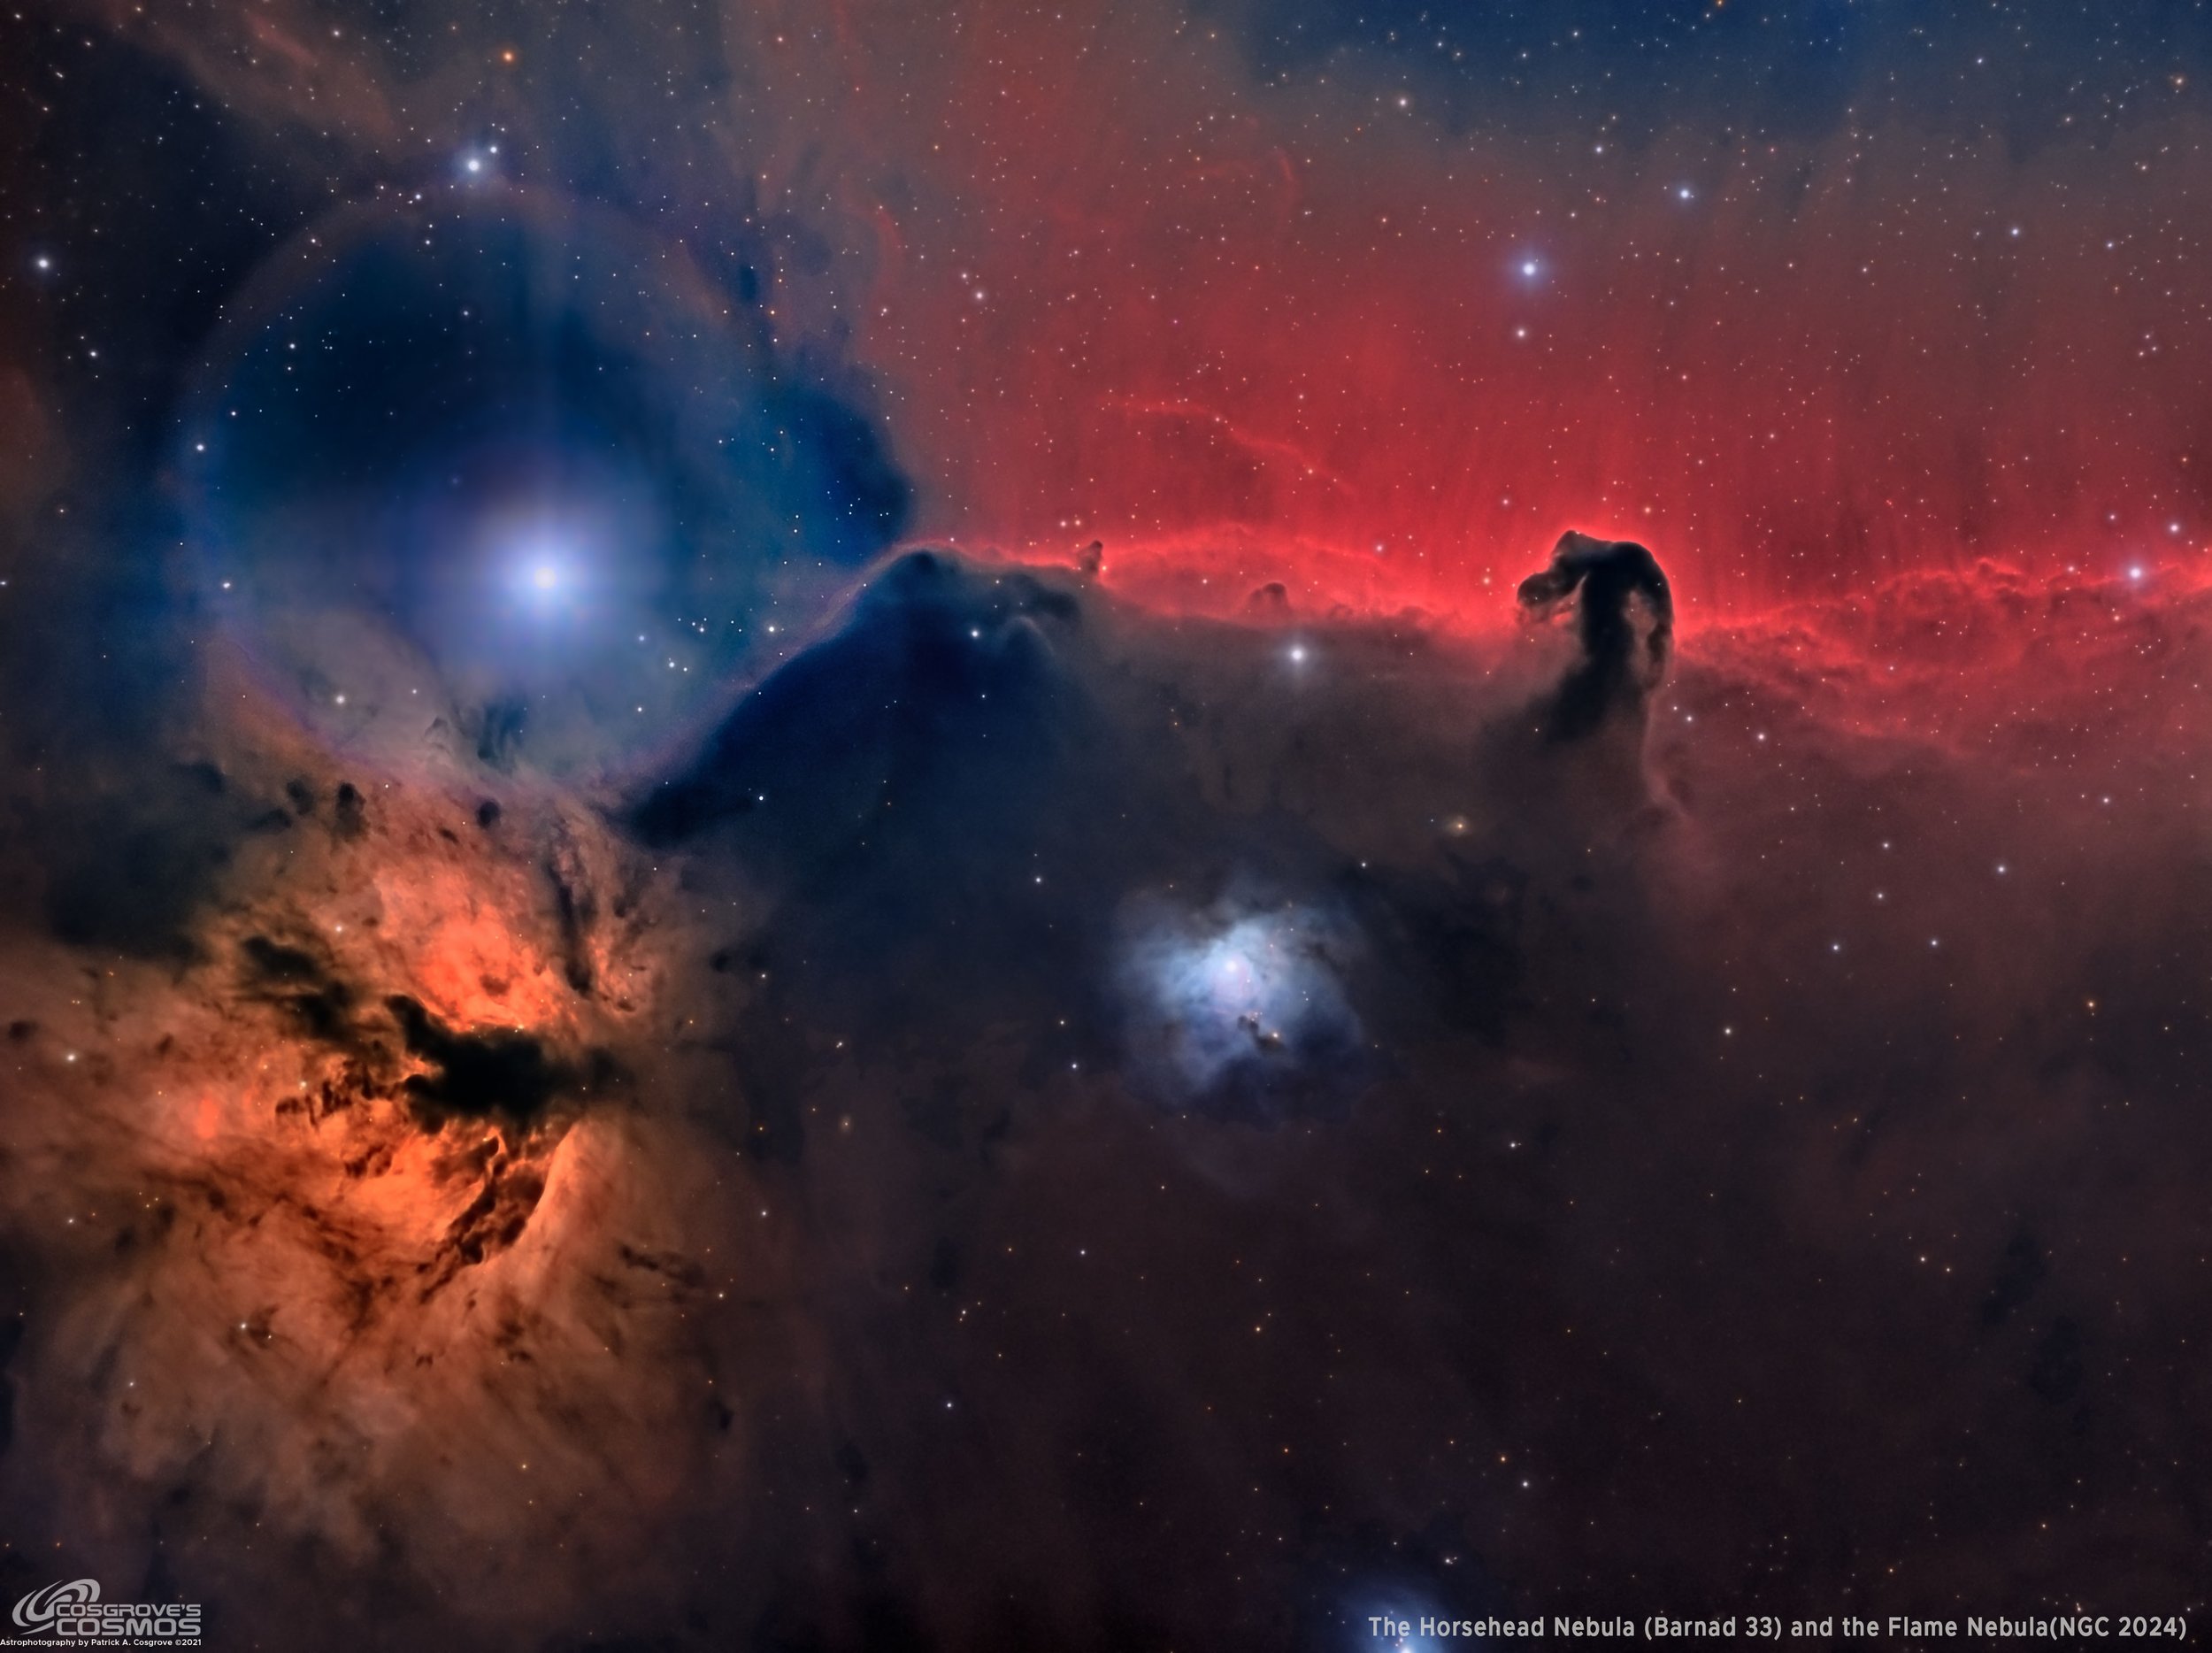
The Horsehead and Flame Nebulas: ~ 4.7 hours LHaRGB. A failed image due to halos and microlens artifacts on Alnitak and my inability to process the image to minimize these effects. (click for full res image via Astrobib.com)
Table of Contents Show (Click on lines to navigate)
The Annotated Image

This Annotated image of the Horsehead and Flame nebula was created using the ImageSolver and AnnotateImage Scripts in Pixinsight.
The Location in the Sky

IAU/Sky & Telescope Constellation Map of Orion - with the Horsehead/Flame region marked by the yellow arrow.
About the Target
The Horsehead Nebula is a small dark nebula located just to the south of the bright star Alnitak - the left-most star on Orions Belt. It is located some 1300 light-year from the earth. On the other side of Alnitak is the Flame Nebula. This object was discovered by the Scottish Astronomer Williamina Fleming , on a photographic plate taken by the Harvard College Observatory in 1888. It was first cataloged by E.E. Barnard as a dark nebula designated as Barnard 33.

Willamina Fleming, 1857-1911

E.E. Barnard, 1857-1923
This region is rich in dust and molecular clouds that are ionized by the radiation coming from Alnitak. This is a rich area for star formation.
About the Project
An Image Failure?
Not every image done by an astrophotographer is an absolute success. But you might think that was the case because experienced astrophotographers tend to consistently show you such great images. But while the yield goes up with greater knowledge and experience you still produce a certain number of images that just don’t come out as good as you would have liked them to.
Many Astrophootgraphers - especially ones with some experience under their belts and a developing reputation - choose to not share images that are less than stellar (pun intended!) examples of their work. This self-censorship probably does help their reputations but does little to show what the reality is. Further, failed images can be sources of significant learning.
So when I started this website, I made a decision. I would share each and every project. If the image was bad - so what? Share it. Show what can happen. Talk about why it happened. Talk about what you tried to do to overcome the problems you have with that image. Talk about what you learned from the image.
To me, this image is a failure. I have used this scope/camera combination on a number of projects and achieved good results with it. It seems to do well with faint and fuzzy nebulae or galaxy fields. However, as I learned, it does NOT do well with a very bright star in the field of view. And Alnitak is clearly a very bright star.
The ASI1600MM-Pro camera has two issues that make it a poor choice for this target. First - it has microlenses on each pixel. The sensor also has no antireflection coatings on it. When presented with a bright star - you get microlens reflection artifacts and large haloes around the star. The structure of these artifacts makes it very hard to remove them from the image. I tried a lot of things but I am not happy with my final result. I think it looks very unnatural and detracts from the image. Thus I deem this a failed image
But let’s see what we can learn from this failed image!
Data Collection
The data for this target was collected during an amazing stretch of 4 days that were clear and moonless from November 5th through the 8th. During this time, data was collected for 9 targets and this is the 5th target that I processed from this run. My William Optics FLT 132mm FLT platform was used for this capture, using its IOptron CEM60 mount and my ZWO ASI1600MM-Pro camera. This, as it turns out, was a poor choice for this target. I’ll discuss this in a bit. 90-second subs were taken using ZWO LRGBM Gen II filters, and 300-second subs were taken using an Astrodon 5nm Ha filter.
Why choose this target?
Well - Orion is probably my favorite part of the sky. I have loved it since I was a little kid. I could easily recognize the three stars in Orion’s Belt and the winter giant standing tall in the sky captured my imagination.
When I was a kid, the Strasenburge Planetarium opened up in Rochester and it really sparked my interest in astronomy. Its gift shot was the only place around then that had cool astronomy-related stuff to buy and every trip to the Planetarium was followed by an hour of gawking at the item in the gift shop! On one of my first visits there, they showed the winter constellation on the dome and for Orion, they projected an image of the Horsehead Nebula. This made a huge impression on me, and was a primary motivator in me getting my first telescope!
That happened a few years later when I got a very wobbly Sears 2.4” refractor. I soon learned, much to my disappointment - that I could not see the Horsehead Nebula with that scope. I then learned that it was only really visible in much larger instruments and even then - best seen as a captured image where exposure was built up over time.
The first year that I started doing Astrophotography, I had one clear winter night and I was able to capture my first images of the Horsehead! In fact - I could even faintly detect it with a single subframe! I was pretty psyched about it. It was not a great image - but I was actually able to see it for the first time - fulfilling a desire I had for most of my life.
So when I was trying to find targets to add to my shoot list for the November 5th capture series, I found that I could fit this in and just had to add it to my list.
Now ideally- this would be a great target for a wider field of view. My FRA400 Platform would have been perfect, but I already had targets that were large and need the scale provided by the 400m scope, so I had to make a call. Also - since the first shot I ever did was using the William Optics scope, I liked the idea of shooting it again with the same scope. This time I would be able to use a mono camera and various filters for capture. My plan was to shoot traditional LRGB, and to add to this some Ha captures.
Comparing the Old Image with the Current Image
That previous effort can be seen HERE.
And here is that image, compared side-by-side with the new image:
The Horsehead and Flame Nebulas - first taken in February of 2020 with the same scope but with the ASI294MM-Prop OSC camera. (click to enlarge)
The most recent effort, using the ASI1600MM-Pro Mono camera. (Click to enlarge)
The older image was the result of only 90 minutes of exposure. It has god color but the overall detail is somewhat lacking. The new image has the benefit of longer exposure (A total of about 4 hours) done with a mono camera and filters, which is more efficient. It also has the benefit of having additional Ha data, with was blended into both the red channel image as well as the final Luminance image. This provides wonderful detail behind the Horsehead nebula itself - sort of a shimmering curtain of light with vertical striations. Both have a halo around the bright star Alnitak, but the halo is much larger on the new image and the area around it looks unnatural. The downside of the Ha addition is that acts to block up the darker portions of the Horsehead itself. It also seems to lack some high-frequency detail, giving everything a somewhat softer look. If it wasn’t for the soft look around Alnitak, I might have been much happier with this new image.
The Results and the Problem
Looking at the various subs, it quickly became clear that I was going to have a problem. From a halo perspective, I was seeing three different halo structures - one set overlapping and one offset. I also was seeing the microlensing reflections as being in a core that was not centered in the moe dominant halo. Add to that, the extensive microlens reflection artifacts - all laid down on top of a complex field.

Here are the R,G,& B Master images - still upside down - showing problem around the bright star Alnitak.

Here are the Lum and the Ha image. Note that the Ha image has the least halo, but still has strong microlens artifiats.
This was going to be a challenge!
As you can see in the processing log, I tried a number of things to minimize the impact of these artifacts. From a high-level perspective here is what I tried:
Since the luminance image provides most of the detail for the final image, I worked more on the Lum image to reduce the artifacts, knowing that some of the color image artifacts would be suppressed when the Lum image was added with LRGBC0mbination.
I created a synthetic Luminance image by blending the Lum Image and Ha image. This blend was partially chosen to minimize the halos.
I used the GAME Brightness mask on just the halo region of the image and then used CT to adjust the neutral tone scale. This was very helpful in eliminating the microlens effects
I used the GAME Edge Gradient to create a mask covering the main halo and then used CT to adjust the color and tone scale to reduce image artifacts from the microlensing.
I also used the MLT tool and experimented with which frequency bands lined up with the structured residual artifacts in the image and used CT to suppress these as well.
All of these did help to an extent. The microlensing artifacts were dramatically reduced and I was happy about that - but the halo fixes fell short. Even after playing with some variations on the ideas above, I was never able to do anything I was happier with.
A year ago, I would have been very happy with the result I ended up with. But today I am not. Every time I look at this image I see the problems I had in minimizing the halo effect and it reinforces to me that this is a “Failed Image.”
Take-Aways
After going through this experience, here is where I come out:
I would no longer use the WO132 Scope/ASI1600MM-Pro combination for a target that has a bright star in its field.
I have never had this problem on my wider field FRA400 platform - which also uses an ASI1600MM-Pro camera - so image scale is a player here as well.
This past year I bought the ASI2600MM-Pro camera and put it on my Astro-Physics 130mm Refractor Platform. I have been delighted with the performance of this camera and I am considering putting a new one in the budget for next year to replace the ASI1600MM-Pro on the WO132 platform.
I still feel that there must be a better and more adaptive method of processing microlens reflection and/or halos from bright stars. I will continue to research this and post an update if I find something that seems to work!
Image Processing Notes
A special note. A while back I began to share extensive details from my processing notes for each imaging project I posted on this website.
Everything up until this point has been pretty much written for a fairly broad audience.
This section, however, is targeted at those who are learning image processing or just want to see the approach I took. There is a much smaller audience that would appreciate the technical details I am sharing here.
In fact, the target audience isn't even really just those who are interested in the image processing side of things - it is really for those that do their processing with Pixinsight.
So if you are not familiar with Pixinsight, the terminology and tools may be hard to follow. Proceed at your own risk. There be dragons here….
Now on the processing!
1. Assess all captures with Blink
Light images
Lum images
Removed 3 because of clouds
Gradients are extremely minor
Alnitak has some halo and microlens reflections
Two images with satellite trails
Red images
2 removed due to clouds or trees
Microlens interreflections
No gradients
Green Images
Looks good
A few satellites trails seen
Blue Images
Looks good
Alnitak is a mess
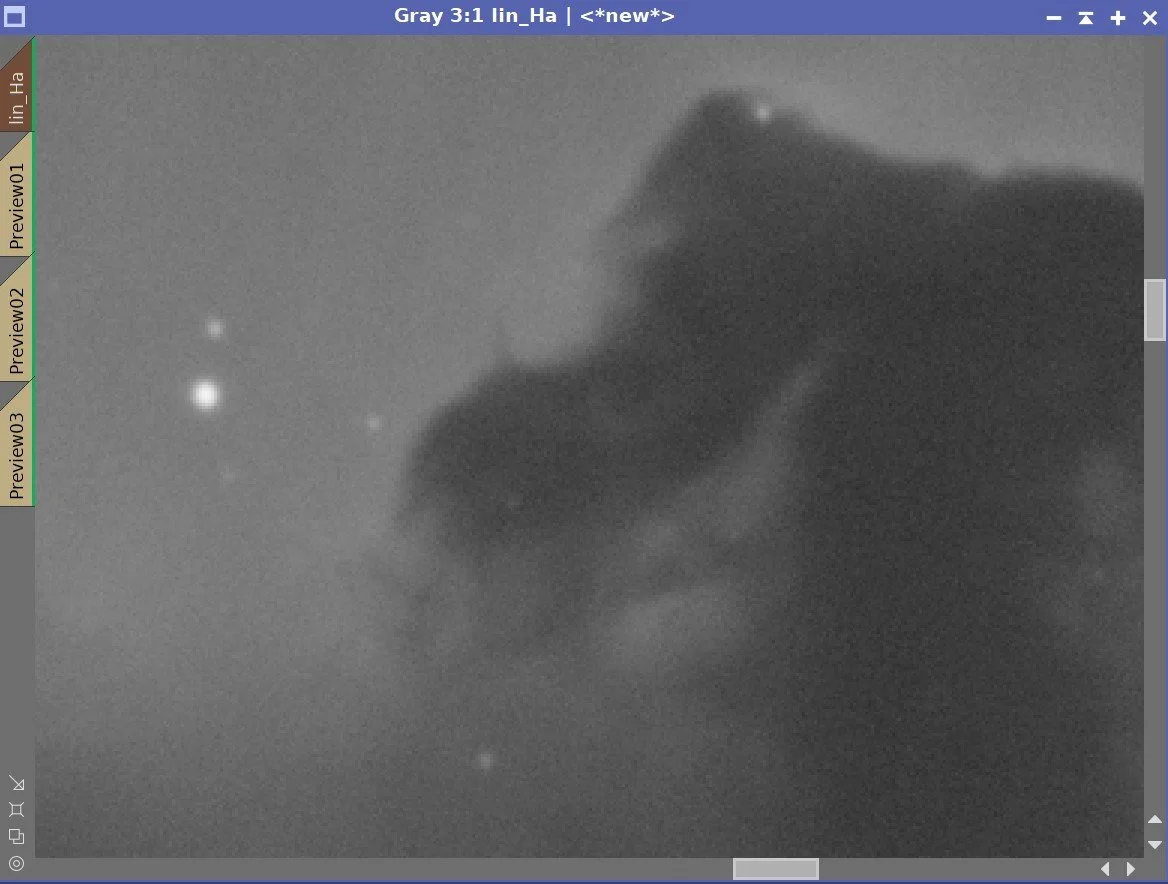
Ha Images
Looks good in general
Some gradients seen
Some microlens reflections seen
Flat Frames - look great!
Flat Darks - All look good.
Darks - all look good.
2. WBPP Script
All images loaded into WBPP
Cosmetic Correction enabled
Pedastal Image of 50 was used on the Ha channel
Integration was NOT enabled.
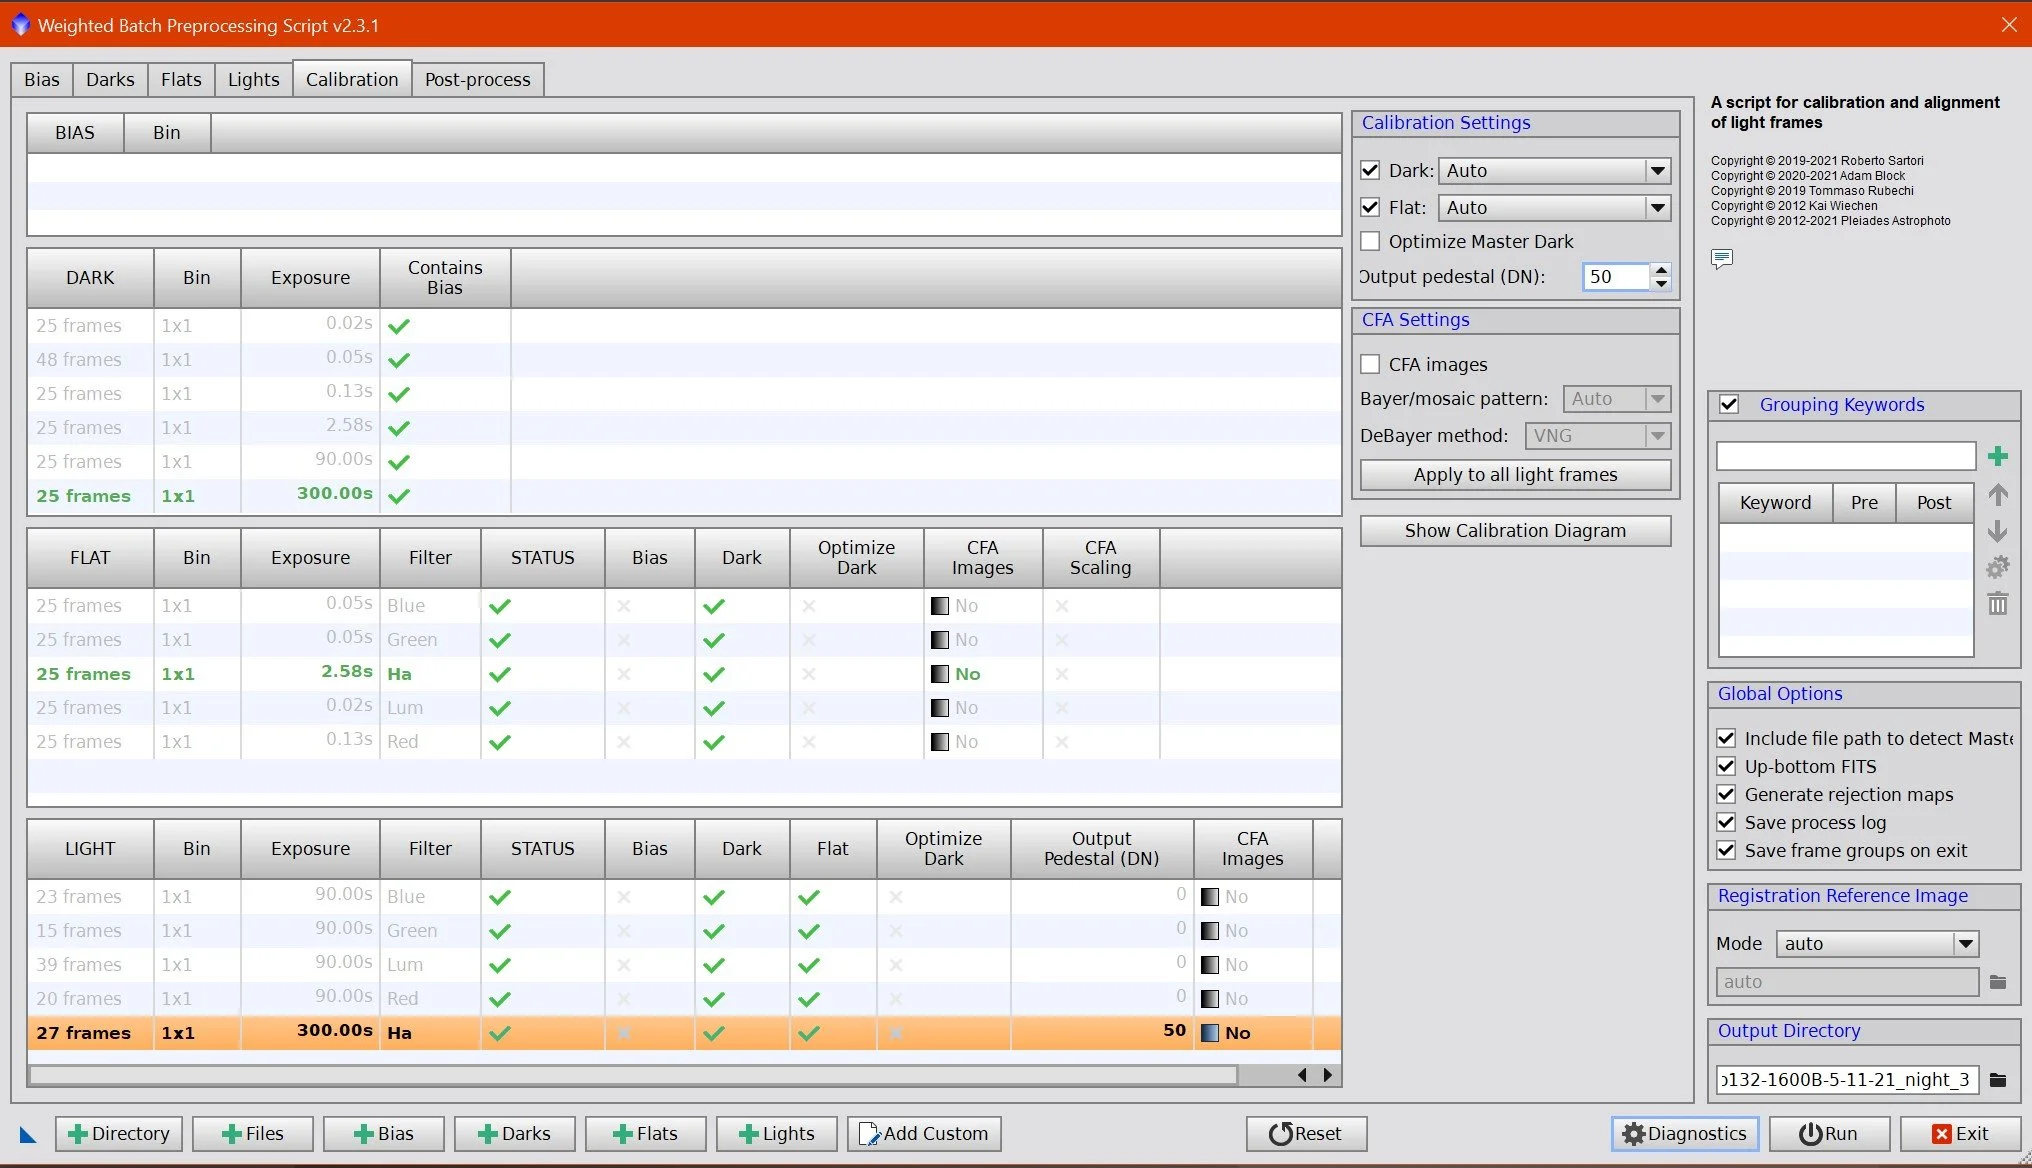
WBPP Main Calibration screen.
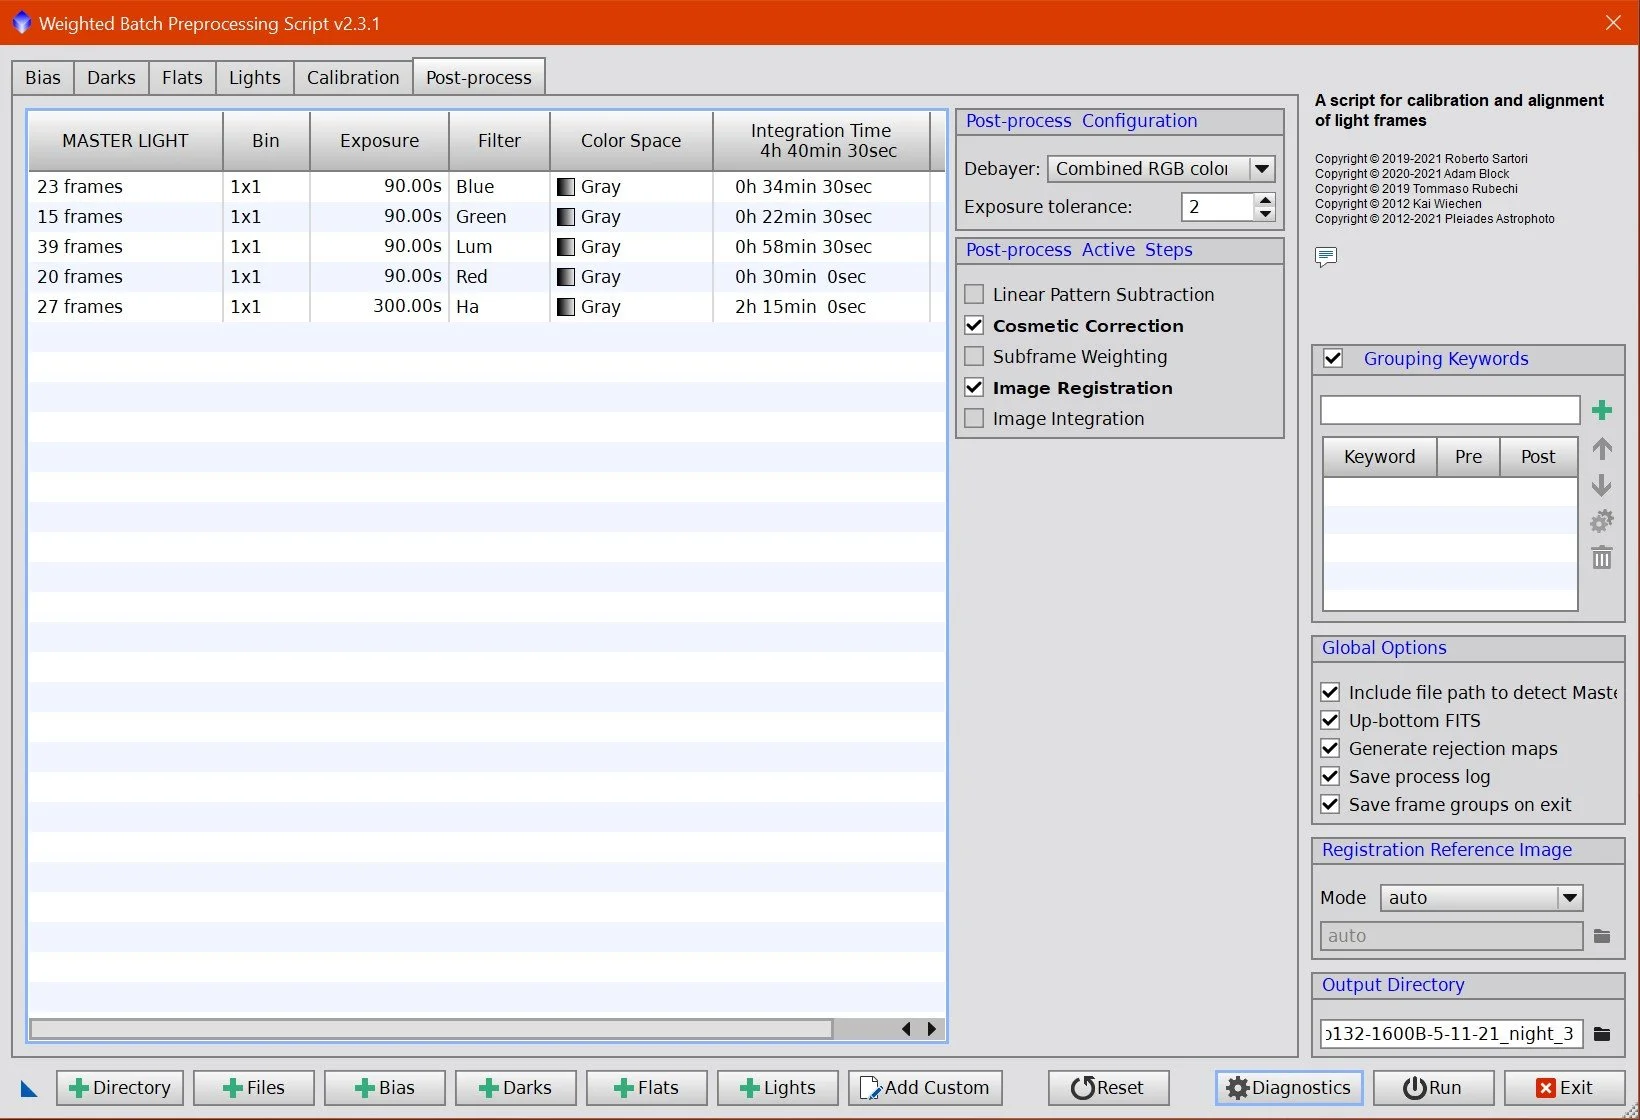
The WBPP Post Process Screen
3. Image Integration
ImageIntegration was run for the LRGB Data sets:
Lum
Lots of samples, so use ESD default parameters for Rejection
Red:
Fewer samples - used WindsorizedSigmaClipping
Green:
Fewer samples - used WindsorizedSigmaClipping
Blue:
Fewer samples - used WindsorizedSigmaClipping
Ha filter data was processed with NormalizedScaleGradient, followed by ImageIntegration

ImageIntegration - Lum

ImageIntagration - Red

ImageIntegration - Green

Image Integration - Blue

Since gradients were seen in the Ha data sets when inspected with Bink, NormalizedScaleGradient script was used to process the Ha Image.

This is the ImageIntegration panel that was pre-populated by the NormializedScaleGradient script.
Red Rejection High (click to enlarge)
Green Reject High. Note Star trail rejection. (Click to enlarge)
Green Reject High. Note Halo and microlens rejections (click to enlarge)
Lum Rejection Hight. Note star trail rejection. (click to enlarge)
Ha Rejection High. (click to enlarge)
4. Image Crop
All filter master images were cropped to eliminate areas that did not have data for all subframes.

Common crop factor used for all images - implemented with the DynamicCrop process
5. Dynamic Background Extraction
No strong gradients were seen in the master images at this point, so DBE was not used.
6. Create Linear Color Image (HaRGB)
Create HaRGB image with SHO-AIP script
Experiment with blends
Test various blends:
Red = 25% Red + 75% Ha
Red = 50% Red + 50% Ha
Red = 75% Blue + 25% Ha
25% Red + 75% Ha was deemed best.
Rotate the image 180 so that it looks right side up.
The Linear HaRGB image using the selected blend.
7. Run DBE on color image
Create a custom sampling plan for the HaRGB image
Run DBE with subtraction
DBE sampling plan for the HaRGB image (click to enlarge)
This is the resulting color gradient DBE found. (click to enlarge)
HaRGB image before DBE correction (click o enlarge)
HaRGB image after DBE correction. (Click to enlarge)
8. Do Color Correction on the HaRGB Image
Setup a preview of the sky background for this image
Run Photometric Color Calibration (PCC) with the setup shown below
Looking at a zoomed portion of the image for the background color, you can see green noise. Run SCNR process to remove the green
PCC Panel setup. Note that background neutralization is using a preview window. (click to enlarge)
PCC create this regression analysis between the stars in this image and the same stars from photometric surveys. (click to enlarge)
The HaRGB Linear image before PCC was run (click to enlarge)
Zooming into the background sky, you could see some green noise evident. (click to enlarge)

The HaRGB linear image after PCC was run. (click to enlarge)
This is after XCNR is applied to remove the green. (click to enlarge)
9. Do some light Noise Reduction on the Linear color image
Run EZ-Denoise with default parameters.
Linear color image before EZ-Denoise (click to enlarge)
Linear colo image after EZ-Denoise is run (click to enlarge)
10. Take the HaRGB image Nonlinear
Select a background area with a preview
Run MaskedStretch with default parameters and use preview image for the background sample
Run ArcsinhStretch - see parameters in screen shot below
After MaskedStretch (click to enlarge)

The ArcsinhStretch parameters used

After ArcsinhStretch (click to enlarge)
Prepare Luminance Images
11. Prepare for Deconvolution for the Lum
Assume that the Lum and Ha image will be combined, so do deconvolution on both
Create Lum and Ha Object masks
Copy image
Make it nonlinear with STF->HT method
Use HT to stress action areas
Use GAME Script to make a mask of the halo regions on each image and apply. Use HT to darken these areas so decon is not operating over them.
Create Local Support image
Run StrarMask setup as shown in the panel shot below
Create psf images. use the PsfImage script
The Lum Object mask with the halo blackout (click to enlarge)
The Ha Object mask with the hal region blacked out. (click ot enlarge)

The parameters set on the Starmask tool to create the local support image (LDSI)

The resulting LDSI image

The Lum Psfmage Run

The Ha PsfImage run
12. Run Deconvolution on the Lum and Ha images.
Apply Object mask to Lum Image
Setup Deconvolution tool to use the psf and local protection images
Select 3 previews
Test and Optimize the Global Dark Parameter with previews
Final Lum Settings: global dark 0.06 with 20 interactions
Final Ha Settings: global dark 0.015 with 20 interactions

Deconvolution Panel setup for Lum image

Deconvolution Panel sttup for Ha

Lum image before deconvolution
Ha Image before Deconvolution

Lum image after deconvolution

Ha image after Deconvolution
13. Create Blended Luminance Image
Determine mix ratio of Lum and Ha images
Using Pixmath, create three images with various blends:
25% Ha + 75% Lum
50% Ha + 50% Lum
75% Ha + 25% Lum
The best blend appears to be 75% Ha + 25% Lum, as it picks up more of the Ha “Shimmering Curtain” effect. Also, this blend reduces the halo effect. While it does bring up the microlens artifacts, I feel I know how to deal with those better.
Finalize new L image
Special Note: I experimented with using ImageIntegration to combine all master images (LRGB & Ha) into one master L image based on a SNR Weighted combination. Theoretically, this should be the best option from an information perspective. However I found the result to be so close to the final blend that I came up with, I stuck with that.
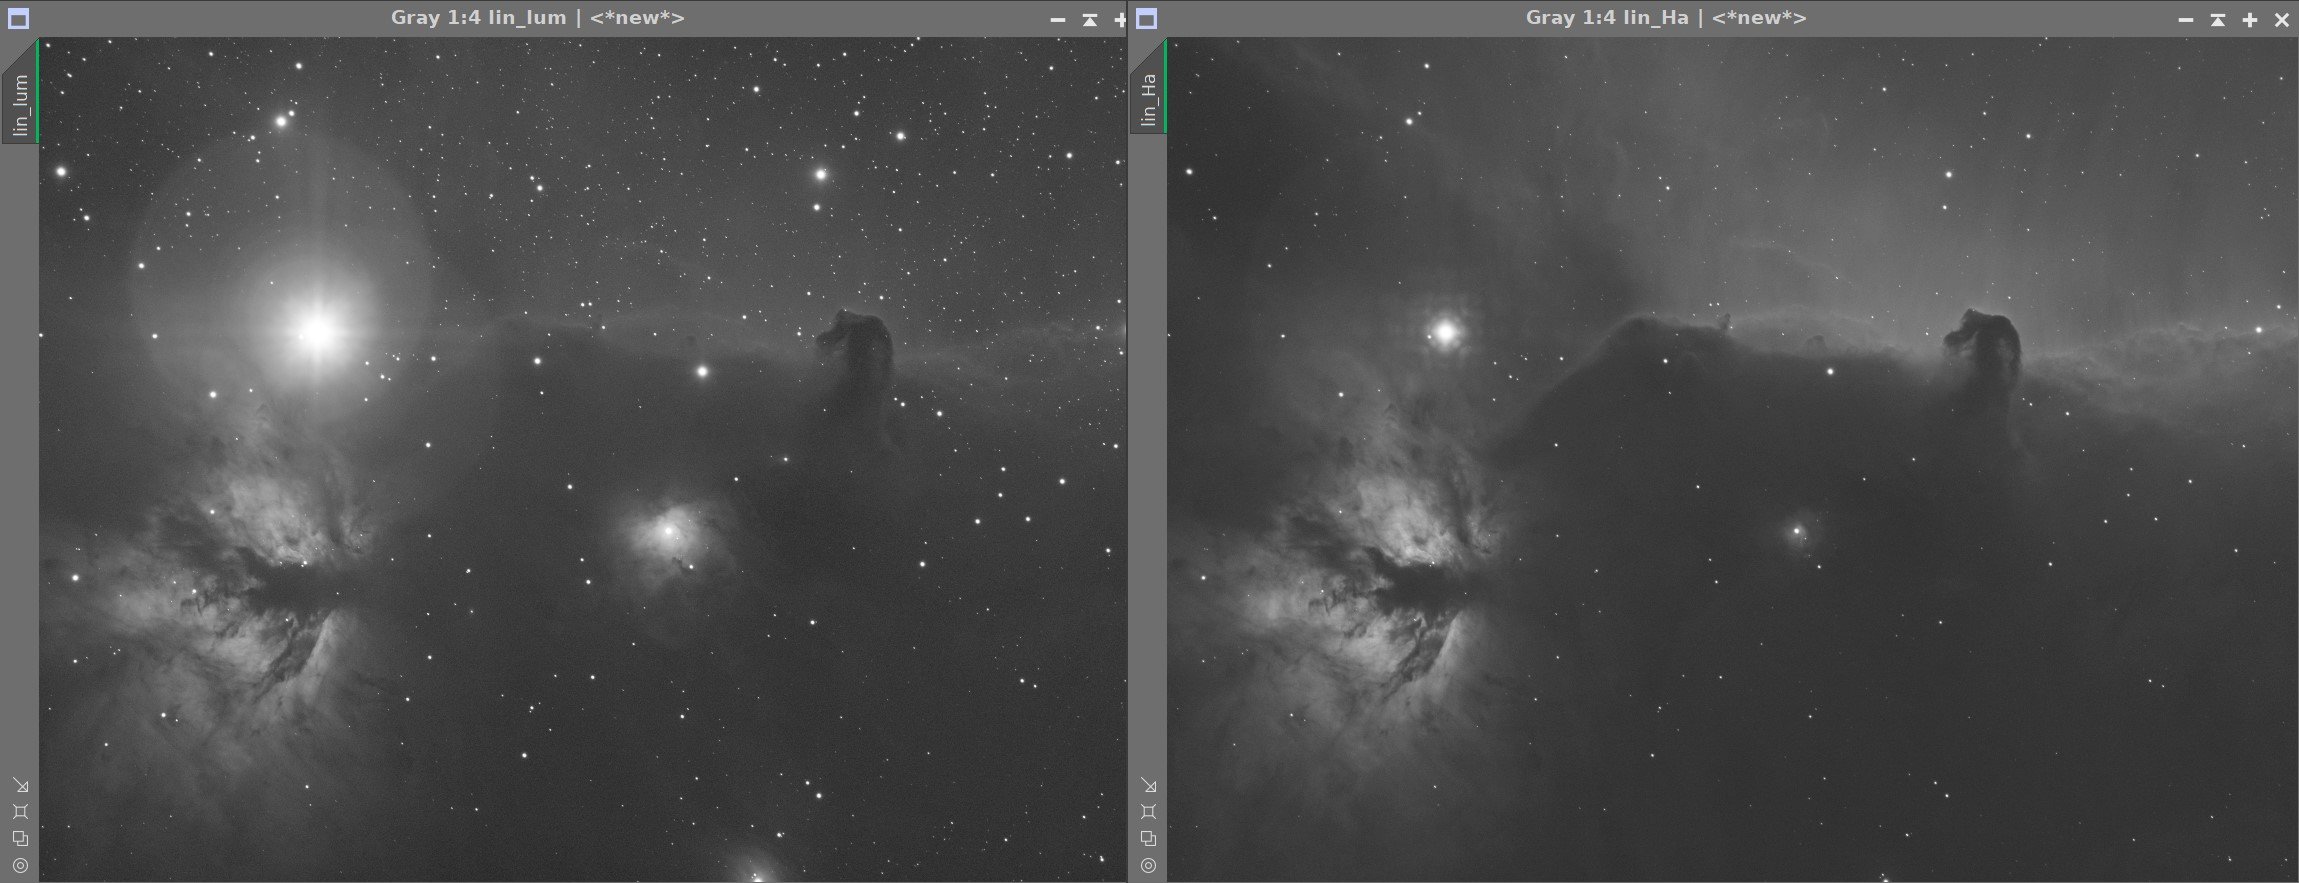
On the Left is the linear Lum image. On the right is the Ha image. Both have different informational content. Also note that the Ha has less halo around Alnitak but more microlens artifacts.

This an example screenshot of how I used PixelMath to blend the images. The weights in the equation change for different blends.

Here are the three blends tested: 25% Ha + 75% Lum, 50% Ha + 50% Lum, 75% Ha + 25% Lum
14. Noise Reduction on the new L image.
Run EZ-Denoise with default parameters.
Linear L image before EZ-Denoise (click to enlarge)
Linear L image after EZ-Denoise (click to enlarge)
15. Take L image Nonlinear
Select background sky preview
Use the preview and run MaskedStretch
Use CT to tweak the tone scale
L image after MaskedStretch (click to enlarge)

L image after additional CT tone scale tweaks (click to enlarge)
16. Further PRocess the nonlinear L image
Make a new GAME gradient mask of large halo - Apply. This will protect the halo region from local contrast enhancements that will be done next
Enhance local contrast at three different scales:
Run LHE radius 32, contrast limit 2.0, Amount of 0.24, 8-bit histogram
Run LHE radius 250, contrast limit of 2.0, Amount of 0.2, 12-bit histogram
Run LHE radius of 120 contrast limit of 2.0, Amount of 0.2, 10-bit histogram
Adjust the brightness of the Flame region
create a mask with GAME - apply
Use CT to darken and increase contrast on flame
Initial Tweak of the Halo region
Re-apply Halo Mask
Use CT to Darken slightly
Run convolution with std dev 8
Sharpen image
Invert Halo the Mask so the halo region is not sharpened.
Sharpen with MLT

The Gradient Mask used to focus on Halo region or protect it.
The L image before the LHE series (click to enlarge)
The L image after the LHE series (click to enlarge)
The L image with a lightweight Halo tweak (click to enlarge)
17. Create Nonlinear LHaRGB Image
Use LRGBCombination tool to inject the L image into the HaRGB image.
Use CT to adjust the Tone scale, red, blue, and sat curves
Tweak local contrast a bit more
Run LHE radius 173, contrast limit of 2.0, Amount of 0.2, 8-bit Histogram
Run LHE radius 50, contrast limit of 2.0, Amount if 0.25, 8-bit Histogram
The final L image used. (click to enlarge)
The FInal HaRGB image used. (Click to enlarge)
After LRGBCombination. (click to enlarge)
After CT and LHE adjustments
18. Run nonlinear Noise Reduction
Run ACDNR with parameters shown below

ACDNR Lightness Panel

ACDNR Chrominance Panel
Before ACDNR (click to enlarge)
After ACDNR (click to enlarge)
19. Do image wide Star Reductions
Run Z-StarReduction with default parameters using the Adam Block method
Before Star Redution (click to enlarge)
After Star Reduction (click to enlarge)
20. Attempt to Fix Halo and Microlens Reflections
Crete a Brilliance map using GAME
Create an Edge Gradient Mask using GAME
Apply the Brilliance Mask
Use CT to darken microlens features
Apply edge gradient mask
Use MLT (see panel snapshot below for parameters used) to smooth out details in the halo

The Halo Brilliance Map. Note how it captures the structure from the microlens relfections

This is the edge gradient map applied to the image.
Before CT used to minimize microlens reflections (click to enlarge)
After CT used to minimize structure (click to enlarge)

This is the MLT panel parameters developed after some trial and error
After MLT is applied. Its better - but not great at all! (click to enlarge)
21. Enhance Color Regions
Make a red mask using ColorMask
Use HT to exaggerate contrast to create an object mask
Make a copy of this mask
In one version, use the DynamicPaint and wipe out the flame, leaving a nice Horsehead Nebula Mask
In the other version, use the DynamicPaint wipe out the Horsehead, leaving a nice Flame Nebula Mask
Apply the Fame Mask and use CT to adjust Flame
Apply the Horsehead Mask and adjust with CT

Red mask with high contrast

Wipe out Flame to create Horsehead mask

Wipeout Horsehead to create flame mask

FInal Pixinsight image after Horsehead and flame adjustments
22. Finalize image in Photoshop
Export as 16-bit tiff
Open in Photoshop
Use Camera Raw filter to tweak color, tone, and Clarity
Use Starshrink to reduce small stars
Use Starshrink to reduce large stars
Use Starshrink to reduce medium stars
Selective Lasso of regions to enhance clarity and texture
Add watermarks
Export various versions of the image
More Information
Wikipedia: Horsehead Nebula
HubbleSite: Hubble Space Telescope Image of the Horsehead Nebula
Wikipedia: The Flame Nebula
Wikipedia: Alnitak
Capture Details
Lights
Images were taken on the nights of Nov 5-8, 2021
39 x 90 seconds, bin 1x1 @ -15C, ZWO L filter, Gen II
20 x 90 seconds, bin 1x1 @ -15C, ZWO R filter, Gen II
15 x 90 seconds, bin 1x1 @ -15C, ZWO G filter, Gen II
23 x 90 seconds, bin 1x1 @ -15C, ZWO B filter, Gen II
27 x 300 seconds, bin 1x1 @ -15C, Astrodon 5nm Ha filter
The total integration time is 4 hours 40 minutes
Cal Frames
25 Darks
12 Flats Ha , L, R, G, & B
25 Flat Darks
Capture Hardware
Scope: William Optics 132mm f/7 FLT
APO Refractor
Focus Motor: Pegasus Astro Focus Cube 2
Cam Rotator: Pegasus Astro Falcon
Guide Scope: Sharpstar 61EDPHII
Guide Focus Motor: ZWO EAF
Mount: Ioptron CEM 60
Tripod: Ioptron Tri-Pier
Camera: ZWO ASI1600MM-Pro
Filter Wheel: ZWO EFW 1.25” 8 slot
Filters: ZWO Gen II 1.25” LRGB,
Astrodon 5nm Ha & O3 filters,
Astronomiks 6nm S2 filer
Guide Camera: ZWO ASI290MM-Mini
Dew Strips: Dew-Not Heater strips for
Main and Guide Scopes
Power Dist: Pegasus Astro Pocket Powerbox
USB Dist: Startech 8 slot USB 3.0 Hub
Polar Align Cam: Polemaster
Software
Capture Software: PHD2 Guider, Sequence Generator Pro controller
Image Processing: Deepsky Stacker, Pixinsight, Photoshop - assisted by Coffee, extensive processing indecision and second-guessing, editor regret and much swearing….
I was very excited to get the ZWO ASI2600MM-Pro camera a while back. I ordered it when it was announced and then prepared to wait a long time to get it. When I did get it - I decided to put it onto the AP130 platform. That meant that I could move the ZWO ASI1600MM-Pro, along with its filter wheel over to my William Optics Platform. This now means that all of the platforms have been moved over to a mono camera and my ZWOASI924MC-Pro is now not in use.