A guide to Turbo Modules in React Native
Amit Kumar
Transforming Connections: LinkedIn's Software Heroes Shaping Tomorrow's Networks.
As a React Native developer, I highly value the flexibility offered by the framework's cross-platform capabilities. However, there are instances where direct access to native functionalities becomes essential. This is where Turbo Modules step in—a doorway to React Native's native realm.
This article aims to elucidate what Turbo Modules entail and the fundamental necessity that led to their inception. Furthermore, it will walk you through a detailed example, illustrating the creation of a personalized Turbo Module and its seamless integration into your React Native application. This integration will enable direct interaction with an Android Native API. The resulting application can be effortlessly executed on various Android or Fire OS devices, as demonstrated below:

Why Turbo Modules Matter: Surpassing the Constraints of Native Modules
Previously, in React Native, intercommunication between the Native and JavaScript layers occurred via the JavaScript Bridge, commonly known as Native Modules. However, this method had several limitations:
The bridge functioned asynchronously, batching multiple calls to the native layer and executing them at set intervals.
Data passing through the bridge required serialization and deserialization on the native side, leading to increased overhead and latency.
The bridge lacked type safety, allowing any data to pass without strict enforcement, leaving the native layer responsible for appropriate handling and processing.
During app initialization, loading all native modules into memory caused delays in the app launch for users.
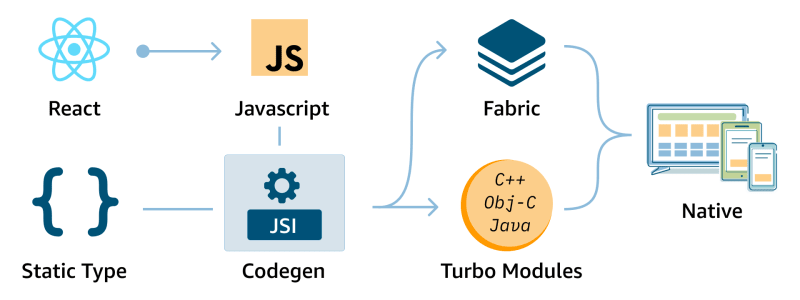
To address these issues, the creators of React Native introduced the New Architecture that encompasses Codegen, Turbo Modules and Fabric.

Turbo Modules, the evolved version of Native Modules, tackle the asynchronous loading problems by deferring module loading until necessary, resulting in faster app launches. By sidestepping the JavaScript bridge and directly communicating with native code, they trim down the overhead between JavaScript and native code.
Codegen steps in to ensure type safety by generating a JavaScript interface during build time. These interfaces maintain synchronization between native code and data from the JavaScript layer. Moreover, Codegen facilitates JSI bindings, enabling swift and direct interaction between JavaScript and native code, bypassing the need for a bridge. This optimization leads React Native apps to achieve swifter and more efficient communication between their native and JavaScript layers.
Additionally, Fabric stands as the new rendering system for React Native, leveraging Turbo Modules and Codegen. These elements collectively form the bedrock of React Native's new architecture, promising heightened performance, bolstered type safety, and streamlined interoperability between native and JavaScript code.
So, when might you find Turbo Modules handy?
Accessing Device APIs: When you require direct access to device APIs beyond standard JavaScript modules, Turbo Modules come in handy. They empower integration with device-specific capabilities (like sensors or Bluetooth) that aren't readily exposed via regular JavaScript modules. While some functionalities might be achievable through standard modules, Turbo Modules ensure optimal performance and access to the full spectrum of native APIs.
Native UI Components: Turbo Modules shine when creating custom native UI components. These components offer a smoother and more efficient user experience compared to their JavaScript-based counterparts.
CPU-Intensive Tasks: For tasks that heavily tax the CPU, such as image processing or complex calculations, Turbo Modules can shift these tasks to native code. Leveraging the device's computational prowess optimizes app performance.
Now, for creating a Turbo Module:
Let's explore how to integrate a custom Turbo Module into a React Native app with the new architecture enabled. Our example Turbo Module will retrieve the model number of an Android device, displaying it within the app. This approach ensures compatibility across various Android devices, including Amazon Fire devices.
Prerequisites
React Native 0.69 - this is the version introduces the new Architecture.
Typescript app - Codegen requires that we use types.
Tip: Remove any old versions of react-native-cli package, as it may cause unexpected build issues. You can use the command npm uninstall -g react-native-cli @react-native-community/cli
Step 1: Create a new app and setup Turbo Module folders
Create a new folder called TurboModuleDemo and within it create a new app called DeviceName
Tip: In order to keep the Turbo Module decoupled from the app, it's a good idea to define the module separately from the app and then later add it as a dependency to your app. This allows you to easily release it separately if needed.
Within TurboModuleDemo, create a folder called RTNDeviceName. RTN stands for "React Native", and is a recommended prefix for React Native modules.
Within RTNDeviceName, create two subfolders: js and android.
Your folder structure should look like this:
Step 2: JavaScript Specification
As mentioned, the New Architecture requires interfaces specified, so for this demo we will use TypeScript. Codegen will then use these specifications to generate code in strongly-typed languages ( C++, Objective-C++, Java)
Within the js folder, create a file called NativeGetDeviceName.ts. Codegen will only look for files matching the pattern Native{MODULE_NAME} with a .ts, or .tsx extension.
Copy the following code into the file:
Let's look into the code. First is the imports: the TurboModule type defines the base interface for all Turbo Modules and the TurboModuleRegistry JavaScript module contains functions for loading Turbo Modules.
The second section of the file contains the interface specification for the Turbo Module. In this case, the interface defines the getDeviceModel function, which returns a promise that resolves to a string. This interface type must be named Spec for a Turbo Module.
Finally, we invoke TurboModuleRegistry.get, passing the module's name, which will load the Turbo Native Module if it's available.
Step 3: Adding Configurations
Next, you will need to add some configuration to run Codegen. In the root of the RTNDeviceName folder
Add a package.jsonfile with the following contents:
Yarn will use this file when installing your module. It is also what contains the Codegen configuration - specified by the codegenConfig field.
Next, create a build.gradle file in the android folder, with the following contents:
This step creates a class, called DevicePackage, that extends the TurboReactPackage interface. This class serves as a bridge between the Turbo Module and the React Native app. Interestingly, you don't necessarily have to fully implement the package class. Even an empty implementation is sufficient for the app to recognize the Turbo Module as a React Native dependency and attempt to generate the necessary scaffolding code.
React Native relies on the DevicePackage interface to determine which native classes should be used for the ViewManager and Native Modules exported by the library. By extending the TurboReactPackage interface, you ensure that the Turbo Module is properly integrated into the React Native app's architecture.
This means that even if the package class appears to be empty or lacking implementation, the React Native app will still recognize and process the Turbo Module, attempting to generate the required code to make it functional.
Create a folder called rtndevice under: android/src/main/java/com. Inside the folder, create a DevicePackage.kt file.
At the end of these steps, the android folder should look like this:
Step 4: Adding Native Code
For the final step in creating your Turbo Module you'll need to write some native code to connect the JavaScript side to the native platforms. To generate the code for Android, you will need to invoke Codegen.
From the DeviceName project folder run:
Tip: You can verify the scaffolding code was generated by looking in: DeviceName/node_modules/rtn-device/android/build/generated/source/codegen
The native code for the Android side of a Turbo Module requires you to create a DeviceModule.kt that implements the module.
In the rtndevice folder create a DeviceModule.kt file:
Add the following code the the DeviceModule.kt file:
This class implements the DeviceModule which extends the NativeGetDeviceNameSpec interface that was generated by codegen from the NativeGetDeviceName TypeScript specification file. It is also the class that contains our getDeviceModel function, that returns a promise with the device model as a string.
Update the DevicePackage.kt
Step 5: Adding the Turbo Module to your App
To add the Turbo Module to your app, from your DeviceName app folder, re-run:
Tip: To ensure the changes in your TurboModule are reflected in your app delete your node_modules before performing the yarn add.
Now you can use your Turbo Module to use the getDeviceName function in your app!
In your App.tsx call the getDeviceModel method:
Check out your Turbo Module in action by running npm run android on any Android device including the Amazon Fire OS Devices:

Congratulations for successfully implementing a simple Turbo Module in an app!
Software Engineer - React/React Native with Nodejs and Mongodb
1moLooking for More Article in This Topic! Turbo Modules in React Native